 |
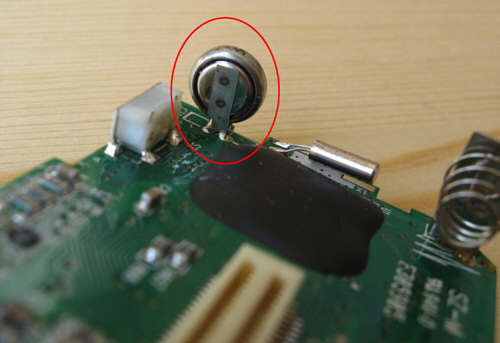
 If the camera has no power, intermittend power failures or short battery run time then check the battery connectors. A lot of times the battery connectors are not connected properly. This is because the material of the connectors is hard to solder. You have to apply the solder tip for approx. 30 seconds so that the material is hot enough and accepts the solder core.
|
 Hat die Kamera keine Versorgung, Spannungeinbrüche oder eine sehr kurze Batterielaufzeit dann sollte man die Batteriekontakte prüfen. Oft sind diese nicht korrekt an die Platine angebunden. Der Grund dafür ist, dass das Material der Kontakte nur sehr schwer zu löten ist. Man muss die Kontakte mindestens 30 Sekunden lang aufheizen bevor sie überhaupt Lötzinn annehmen.
|
 |
Blurred or partly blurred images are often the result of a tilted lens. This could have been created during disassembly of the camera. To correct this unscrew the lens and screw it in again watching that it is not again tilted. Sometimes the lens holder ist not screwed firmly to the board.
Is the lens adjusted too deep or too high the result are also blurred images. This can be solved easy by taking a sequence of pictures with different lens position settings.
|
Unscharfe oder teilweise unscharfe Bilder haben oft die Ursache in einer verkippten Linse. Dies kann z.B. beim Auseinanderbau der Kamera entstehen. Zur Korrektur wird die Linse ganz herausgeschraubt und dann wieder eingeschraubt. Manchmal ist auch eine Befestigungsschraube am Linsenhalter locker.
Ist die Linse zu wenig oder zu tief eingeschraubt kommt es natürlich auch zu unscharfen Bildern, dies kann jedoch einfach ueber Probeaufnahmen mit verschiedener Linsenposition gelöst werden.
|
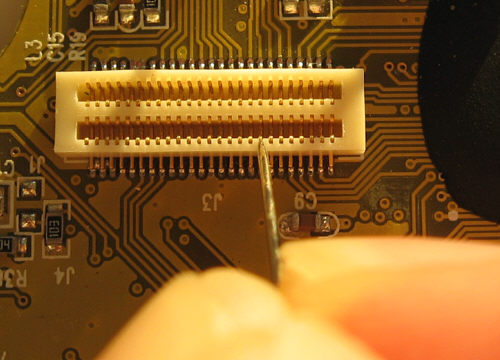 |
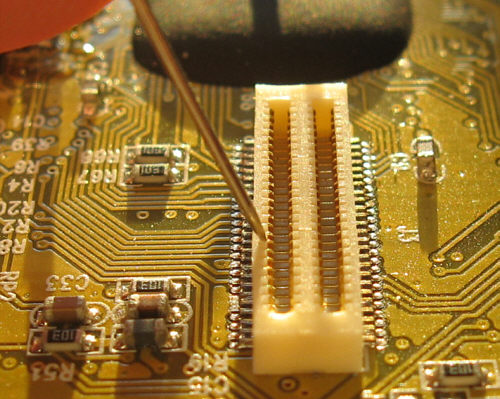
A lot of electrical issues with the CatCam are originated by the board interconnector. Here is a list of some known issues: camera can not be switched on, camera produces false colors, camera produces white images, camera can not switch off.
All of these can be cured by a simple measurement. First open the camera, then put the two boards appart so that you have access to the interconnector. The important side is the one with the metall contacts on the side (female) as shown above. The reason for all the issues is a bad electrical connection caused by this connector. Please do not drop from you chair when you see the number of contacts. To improve the contact you need a needle or an other very thin but strong object. Press the needle in the gap between the contact pin and the outer frame. Gently lift the contact pin. There is not much force required. The target is to move the contact pin a bit more toward the connection area so it touches the opposite connector which is plugged in later. Do this for all pins. If you applied too much force and one connector is bend to far, when push it back either with a needle or with a sharp blade of a cutter knife. Make sure all connector stay in their own grid.
After this job is done, connect the two boards and reassemble the camera. Your problem is in 90% of all cases solved. For the remaining 10% check this: battery connector loose, shorts caused by metal contamination (clean boards with toothbrush), cold solder junctions (especially capacitors), short of controller chip wires close to the solder joints (no wire should touch any metal area except the solder joint location, inspect especially supply wire and on/off switch). |
Viele, wenn nicht gar alle, elektrischen Probleme der CatCam werden durch den Platinenzwischenstecker verursacht. Hier eine kleine Liste von bekannten Symptomen: Kamera kann nicht eingeschaltet werden, Kamera produziert Falschfarben, Kamera produziert weisse Bilder, Kamera kann sich nicht abschalten.
All diese Probleme können mit einer einfachen Massnahme gelöst werden. Dazu zuerst die Kamera öffnen, dann die zwei Platinenhälften auseinanderziehen. So hat man Zugang zum Zwischenstecker, die wichtige Seite ist die bei der die Metallkontakte an der Seite verlaufen (weibliche Hälfte). Siehe oben. Die Ursache für die ganzen Probleme ist ein schlechter elektrischer Kontakt im Stecker. Bitte nicht vom Stuhl fallen angesichts der Vielzahl an Kontakten. Um die Kontaktstellen zu verbessern braucht man eine Nadel oder einen anderen spitzigen und stabilen Gegenstand. Die Nadelspitze in die Lücke zwischen den Kontaktstift und den Aussenrand drücken. Dann den Stift leicht anheben. Es wird nicht viel Kraft benötigt. Das Ziel ist den Kontaktstift ein bisschen in Richtung des Steckerbereichs zu biegen. Diese Prozedur für alle Kontaktstifte durchführen. Wenn zu viel Kraft aufgewendet wurde und der Stift weit verbogen ist, dann kann der betreffende Stift mit der Nadel oder einer scharfen Klinge (z.B. Cutter-Messer) zurückgebogen werden. Sicherstellen dass alle Stifte in ihrem Raster bleiben.
Nachdem diese Aufgabe erledigt ist die zwei Platinenhälften wieder zusammenstecken und die Kamera zusammenbauen. Das Problem ist in 90% der Fälle behoben. Für die restlichen 10% bitte folgendes prüfen: Batteriekontakt lose, Kurzschlüsse durch Metallverunreinigungen (Platinen mit alter Zahnbürste reinigen), kalte Lötstellen (speziell Kondensatoren), Kurzschluss von Controller-Chip Leitungen nahe der Lötstellen (kein Draht sollte eine andere metallische Fläche berühren als die dafür vorgesehene Lötstelle, inspiziere hierzu speziell den positiven Versorgungsdraht sowie den Ein/Aus-Schalter). |
 |
|
With a new version of the VQ1005 camera a buffer capacitor is integrated. His purpose is to supply the SRAM during battery exchange. The problem is that the capacitor does not only supply the SRAM but the whole internal circuit including the CatCam controller. This makes it impossible to adjust the interval time once the capacitor is charged because the CatCam controller requires a power-on reset in order to adjust the time. The solution is to remove the capacitor. If the camera is used with SD card in has no impact to the camera function.
|
Mit einer neuen Version der VQ1005 Kamera wurde ein Pufferkondensator integriert. Seine Aufgabe ist es das SRAM während eines Batteriewechsels zu versorgen. Das Problem ist nun dass nicht nur das SRAM sondern die gesamte interne Schaltung versorgt wird inklusive dem CatCam Controller. Dies macht es unmöglich die Intervalzeit zu verstellen wenn der Kondensator ersteinmal geladen ist. Der CatCam Controller benötigt ein Power-On Reset um die Intervalzeit einzustellen. Die Lösung ist den Kondensator zu entfernen. Wenn die Kamera mit einer SD Karte benutzt wird hat dies keinen Einfluss auf die Kamerafunktion.
|
 |
|
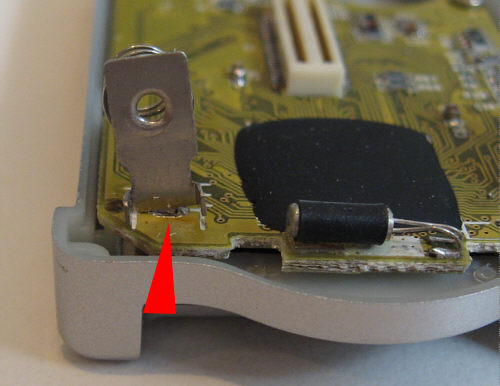
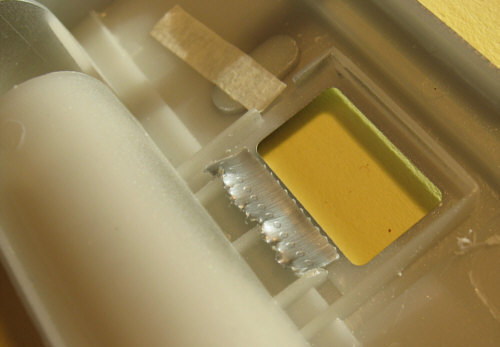
If the LCD is not working or has some missing segments then the counterforce to the contact is usually too low. Apply one or two layers of tape on the shown location to increase pressure.
|
Wenn das LCD nicht funktioniert oder einzelne fehlende Segmente aufweist liegt dies meistens an der fehlenden Gegenkraft auf die Kontaktleiste. Ein oder zwei Lagen dickeres Klebeband auf der gezeigten Stelle erhöht den Gegendruck. |